Natural Oven Cleaner
Before I begin, let me preface this post by saying that I hate to clean. Anything requiring elbow grease is not for me. So my goal in making a natural oven cleaner was two-fold. The first is a given. I wanted it to be made of natural ingredients. Second, I wanted to find something that did most of the work for me. I have always had thin nails and this type of housework does major damage to them. They are slightly stronger now that I’ve been eating healthier, but still not impervious to this grunt work. So besides laziness, vanity was a motivating factor in finding a cleaner that was as close to set it and forget it as possible.
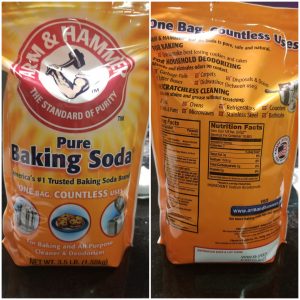
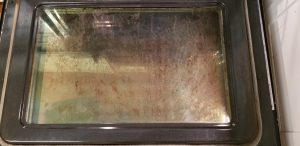
I searched the internet for solutions. There were a few variations, but the one constant was baking soda and water. The measurements also varied, so I came up with my own formulation. But first, let me show you what the oven door looked like before I got started.
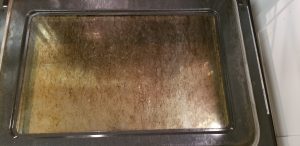
I’ve used my oven’s self clean feature, but it doesn’t really do much for the door. As you can see, the grease is baked in and I am no longer able to see through the window. This was going to take a LOT of elbow grease…sigh!
So here is the formula I used:
4 Tbsp of baking soda
1 Tbsp of Natural Sea Salt
2 Tbsp of room temperature water
The ingredients were mixed together in a small glass bowl and formed a paste-like consistency. I initially added this mixture into a cleaning wand, but the salt prevented it from properly distributing and even got stuck to the sponge head. At this point, I had to dump the contents of the wand onto the glass and spread it around as best I could, with most of the salt being left behind.
I let this sit for about 45-50 minutes to allow the baking soda to cut through the grease. This is where the magic is supposed to happen and the concoction does the work for me. To wipe off the cleaner, and hopefully the baked in grease, I used a cloth wipe that was run under hot water.
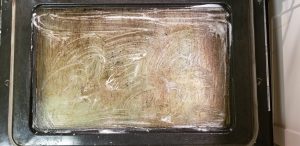
Immediately, the first wipe had the cloth come away full of grease. This had me hopeful. Could it really be this easy? Of course not! I had to apply a bit of pressure as I scrubbed the dried baking soda mixture off the glass, but I didn’t use full elbow grease. I wanted to see just how clean the oven door would be at my current level of effort. Since most of the salt got left behind in the cleaning wand, I was missing that natural abrasive that was meant to do the extra work of scraping off some of the tougher, more stubborn areas. Here is what the oven door looked like when I was done.
As you can see, there is still lots of baked in gunk on the window. But, I could see through some areas, like the bottom left where my hand towel is peeking through. Obviously, this was not the result I was looking for in my natural oven cleaner. Did I wipe it off too soon? Was it the lack of the salt abrasive? So I mixed up another batch of natural oven cleaner. This time, I poured it directly onto the door.
Note: most of the articles I found online suggest that you use a brush (basting brush) to apply the mixture. This is probably the best way to apply it inside the oven, but since I was focusing on the door, pouring it did the job. I then used the sponge head of my cleaning wand to spread it evenly across the door.
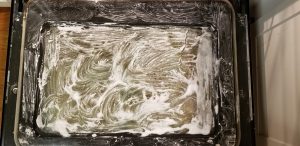
As you can see, this time around, it looks much thicker. This is due to the presence of the salt. Since it was around 10 pm, I decided to let the mixture sit overnight. The oven door was closed both times. Maybe I should have mentioned that before so you don’t think you need to leave it open like this while the mixture does its job. Using the same cloth wipe that I had rinsed out the night before, I got to work first thing in the morning.
The presence of the salt definitely made a difference. The extra set time may also have helped. Once again, I ran the cloth under hot water and used as little elbow grease as possible. As I wiped, the salt would gather in clumps on the cloth. This isn’t necessarily a bad thing as I was able to use those clumps to scrub the more stubborn areas, something I previously would have done with my nail (through the cloth of course). So here, less damage to my nails and no extra pressure needed to be applied. Win/Win! The salt doesn’t dissolve the way the baking soda does so it did require a few extra passes to make sure it was removed. Here is the final result.
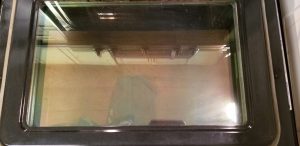
Not bad! There are still a few small super stubborn spots that I probably could have gotten if I gave it “the old college try” but as I said, I wanted to apply as little effort as possible to see just how good the mixture worked. I can now see through the glass to the wood floor below and it even reflects the stove and cabinets above.
I rarely use my big oven when my kids are away at school so this will stay nice and clean for a while. Now, I need to work on cleaning my counter top convection oven that is starting to look suspect thanks to constant use. Maybe I will film that for YouTube so you can see it with your own eyes.
Aside from the ease of cleaning with this natural oven cleaner mixture, I do have to note the lack of tingling and irritation to my skin that is present when cleaning with chemicals. I did not wear gloves and my hands were no drier than normal when using hard water in the winter. Since I didn’t scrub like mad, there is also a lack of finger cramping that I would usually be left with after such a cleaning.
The reusable wipe is done for. Partly because I had tried to scrub out some of the dark grease stains that didn’t come out just by running it under water after the first cleaning, which broke down the cloth and almost made a hole. And partly because there is no way to wash out the grease that it got coated in after the two cleanings. I had also used it to clean up the water and mess (minor spillage of baking soda was involved, as well as the salt clumps during the second cleaning) made from the whole process.
The five pack of reusable wipes only cost about $2. The large 3.5 lb bag of baking soda was also barely over $2 and who doesn’t already have salt at home. Not only is this a healthier alternative for your skin and lungs, it is also so much cheaper. The two mixes I whipped up barely even made a dent in the baking soda. And don’t forget the best thing of all. Since both baking soda and salt can be used in cooking, even if you leave a bit of residue behind, you are not introducing nasty chemicals and carcinogens into your food.
I was tempted to cut a lemon and use that to wipe off the second round, but completely forgot. I know that lemon is also a natural degreaser, but is not recommended to be added directly to the baking soda because they cancel each other out which is why I didn’t add it to the mixture.
Have you tried making your own natural oven cleaner? What did you use?